fbpx

karting

How to Set Up Dual Eccentric Pills on your kart

How to Set Up Dual Eccentric Pills on your kart

In outdoor karts Eccentric Pills are used to adjust the caster and camber of go karts. Indoor karting will eventually lead you to driving and setting up your own outdoor kart. This article examines 16 point eccentrics. Similar rules should apply to 4, 8, 12 point eccentrics.

Eccentrics have an offset center point allowing you to offset the kingpin as you rotate the top and bottom pills. Not many people really understand them, and the information on the internet is scarce. I will try to fill in the blanks.

 Typically these pills are considered to be Caster and Camber adjustments only, but they are actually much more than that as you will see, and they can seriously mess up a kart or bring it magically into alignment. 

 For this reason it is recommended that if you are fairly new, you should only touch your pills in the event that you have a serious problem and need to fix it, because as a new driver your biggest gains are going to come from mastering the line and refining your driver. Pill set adjustments only really start making a difference in lap times when the driver is consistently within .500 of the fast lap time. 

So as a rule of thumb, get your driver right first, and worry about the kart second unless it is totally jacked up and you need to fix a bent and broken kart.

There are two ways to use them.

 1. Zero pills where you have a center pill on the bottom, and then use only one on top (or bottom). This allows for an easier to conceptualize modification of your camber and caster.

 2. Dual Eccentrics top and bottom. This is my preferred way of using eccentrics and the most confusing so we will discuss this method.

 Throughout this guide I will use the following terminology to describe pill positions.

 If you look at the picture above, I show a 16 point eccentric pill set. Note that the northmost position is labeled as #1 and the positions go clockwise to #16. 

 When making pill adjustments we will usually need to make changes to all 4 eccentrics on the LF and the RF top and bottom so I will refer to these as LF[1:1] and RF[1:1] for left front and right front.

 Left Front represents the kart from the drivers perspective so it would be the front wheel closest to his left hand.

 The first part of the number (seen as “[1:” in the [1:1] ) represents the top pill position and the second part of the number (seen as “:1]” in the [1:1]) represents the bottom pill position.

 So if you see RF[2:16] This means to rotate the top pill counter clockwise from position #1 and to place the #2 hole in the place where the #1 hole used to be. So rotate 1 click CCW. Then rotate the bottom clockwise one click to move the #16 hole into the #1 position. LF[1:1]RF[1:1] would mean to set to North Neutral position where both top and bottom are set to position #1.

Note also that the #1 position is furthest from the center hole, and that the center hole is off center. This allows for a total displacement of each kingpin of 3 mm in the north/south axis and 3mm in the east/west axis. If applied equally to both wheels that means we have a total potential displacement of 6mm to the track width and relative length of the kart. This is enough of a range to create a serious displacement of the kart, so be careful.

Now if for example if we were to rotate through the 16 neutral positions from say [1:1] to [2:2] it would have the effect of moving the king pin forwards, upwards and outwards all at the same time. 

Now you can’t move to [2:2] on both sides of the kart and remain balanced because you would be moving both sides in the same direction. Instead if you move the left front to [2:2] then you must move the right front to [16:16]. Now your track width has moved a total of 0.75mm and your kart wheel base has become 0.75mm shorter. Meanwhile your caster and camber has stayed the same, while your ride height raised just slightly.
For now that is inconsequential, but if you had to repair or adjust a kart that had lost it’s squareness, this is a great tool to have in the toolbox. You can adjust your squareness, without affecting your camber and caster and dial out tendencies to pull left and right, which can also remove drag from your straightline speed.

Finding neutral.

Dual Eccentrics allow for a total of 256 possible settings (16 top and 16 bottom). Of these 256 possible settings, 16 of them are actually neutral. Neutral means they do not try to change the caster or camber. They are the positions where the top and the bottom exactly line up.

This table shows the 16 neutral positions for the Right Front (RF) and how they affect ride height and track width in Millimeters. It also shows the corresponding LF setting for neutral and gives an estimate for the total width displacement of that position.

In this diagram red shows the bottom pill setting and black is the top. You can reverse this for the left and right, so on the left side the red would be on top and black on bottom.

LFWidthTotalRFCasterCamberHeightWidthLength
[1:1]-0.0003.000[1:1]00.000-1.500-0.000+3.000
[2:16]-0.7502.250[16:2]00.000        -1.125-0.375+2.625
[3:15]-1.5001.500[15:3]00.000-0.750-0.750+2.250
[4:14]-2.2500.750[14:4]00.000-0.375-1.125+1.875
[5:13]-3.0000.000[13:5]00.0000.000-1.500+1.500
[6:12]-2.2500.750[12:6]00.000+0.375-1.125+1.125
[7:11]-1.5001.500[11:7]00.000+0.750-0.750+0.750
[8:10]-0.7502.250[10:8]00.000+1.125-0.375+0.375
[9:9]-0.0003.000[9:9]00.000+1.500-0.000+0.000
[10:8]+07503.750[8:10]00.000+1.125+0.375+0.750
[11:7]+1.5004.500[7:11]00.000+0.750+0.750+1.125
[12:6]+2.2505.250[6:12]00.000+0.375+1.125+1.500
[13:5]+3.0006.000[5:13]00.000+0.000+1.500+1.875
[14:4]+2.2505.250[4:14]00.000+0.375+1.125+2.250
[15:3]+1.5004.500[3:15]00.000-0.750+0.750+2.625
[16:2]+0.7503.750[2:16]00.000+1.125+0.375+3.000

From this you can see that you can make height, width and length adjustments just using the pills, which can be very handy for straightening out a bent kart.

Using Neutral Quadrants. 

I find the easiest way to think of the neutral positions as starting points, and use the North, West, South, East most position as quadrant starting points depending on what you want to achieve.

North Quadrant – How to adjust Camber only….

Note in this picture, North Quadrant (Q1) starts at position[1:1] and we would place both sides of the kart into north Quadrant. This neutral position is great if you want to make camber adjustments. Because moving the top pill +/- 1 click will rock the king pin top left and right. Then you would make equal counter movements on the bottom to keep the king pin centered and to retain your caster. Note that the following settings all have the same caster. Note that if you number all your pills from 1 to 16, and then place them together on top and bottom, you can then make your camber adjustments by rotating both top and bottom the same amount. IE 1:1, 2:2, will actually move the top and bottom in opposite directions. Because of this the width adjustment top and bottom cancels each other out, and the kingpin rocks left and right on a center point.

RFCasterCamberHeightWidthLength
[1:1]00.000-1.5000.000+0.000
[2:2]0-0.375-1.1250.000-0.375
[3:3]0-0.750-0.7500.000-0.750
[4:4]0-1.125-0.3750.000-1.125
[5:5]0-1.500-0.0000.000-1.500
[6:6]0-1.125+0.3750.000-1.875
[7:7]0-0.750+0.7500.000-2.250
[8:8]0-0.375+1.1250.000-2.625
[9:9]0-0.000-1.5000.000-3.000

If we continue instead of negative camber adjustments, we make positive camber adjustments.

RFCasterCamberHeightWidthLength
[10:10]0+0.375+1.1250.000-2.625
[11:11]0+0.750+0.7500.000-2.250
[12:12]0+1.125+0.3750.000-1.875
[13:13]0+1.500+0.0000.000-1.500
[14:14]0+1.125-0.3750.000-1.125
[15:15]0+0.750-0.7500.000-0.750
[16:16]0+0.375-1.1250.000-0.375


As you can see, there are two settings that will rock the kingpin in or out, but one of them has a higher / lower ride height than the other and one can make the kart longer or shorter..

East Quadrant is achieved by going to [13:5]. This has the effect of moving the center axle holes into the left most position. Note if we were to use East Quadrant on one side, then we would have to use West Quadrant on the other side. But if we use North or South Quadrants then we use them equally on both sides.

Effect on width. Note also that if we use East Quadrant on the RF and West Quadrant on our LF then we just made our total kart length 1.5mm shorter than North Quadrant and also decreased our front track width by a total of 3mm. We have also raised our ride height by 1.5mm. In effect we have raised our center of gravity and should give the kart more bite and downforce. We have also reduced scrub radius so this should make the kart more eager to rotate.

East/West Quadrants – How to adjust Caster Only.

East/West  Quadrants are where we would go to make micro caster changes. From this position we can rock the kingpins forward and backwards. Starting at RF[13:5] we get..

LFRFCasterCamberWidth
[05:13][13:05]0.0000.0000.000
[04:12][12:04]-0.7500.000+0.375
[03:11][11:03]-1.5000.000+0.750
[02:10][10:02]-2.2500.000+1.125
[01:09][09:01]-3.0000.000+1.500
[16:08][08:16]-2.2500.000+1.875
[15:07][07:15]-1.5000.000+2.250
[14:06][06:14]-0.7500.000+2.625
[13:05][05:13]-0.0000.000+3.000
LFRFCasterCamberWidth
[12:04][04:12]+0.7500.000+2.625
[11:03][03:11]+1.5000.000+2.250
[10:02][02:10]+2.2500.000+1.875
[09:01][01:09]+3.0000.000+1.500
[08:16][16:08]+2.2500.000+1.125
[07:15][15:07]+1.5000.000+0.750
[06:14][14:06]+0.7500.000+0.375

Checking and adjusting squareness using eccentrics.

If you only tweaked one side of the kart, then you would make one side longer than the other. You would also need a longer tie rod on one side of the kart and you would need to re-adjust all your steering alignment. 

You could use the pills in this way to square up a kart that does not measure straight. Karts get bent all the time, typically a hit in the rear will bend the longitudinal struts that hold the rear bearing cassettes. These are made to be flexible like shock absorbers, but they also hold the bumper so if they get hit at an angle they are at risk of bending. When they do, your kart will show one side gets longer than the other, or one side is higher than the other, and it will start to pull left or right. Especially if you take your hands off the wheel. You can either get it on a rack or scales, and then bend it, or make emergency repairs using pill adjustment. 

Sometimes even after getting the wheels evenly flat, you are still bent with one side longer than the other. You can then use the pills to dial it back in.

 First to check straightness, you would take a magnet and place it on the front center of the rear axle, then get a metal tape measure and place it on the magnet to lock it to the front of the rear axle. 

 Next measure the distance from axle to kingpin top center on each wheel. Note that when you change your magnet to the other side of the axle that you want to make sure to be the exact same distance from your bearings to the magnet on each side.

 To be square you want the distance to be identical.
Now check the distance to kingpin bottom, you also want these to be identical. You will find here if your steering yoke has been bent and tweaked.
If you are short on one side you can now use a neutral pill setting to make each side longer or shorter.

In the same way your steering tie rods should be the same length when at dead center. If they are not, you can use your neutral pill settings to lengthen one side of your kart. Even though this can have the effect of changing ride heights, width and length, I have found quite often that these adjustments actually bring all in line together as you would need. Something to do with the fact that the kart was probably in line at first, and after the bend, the height, length and width were all affected.

Which neutral to use?

Whether you start from North Quadrant, South Quadrant , East or West, doesn’t really matter in the scheme of things. And how you choose to go is up to you.

Some things to keep in mind though when dialing in the pills.

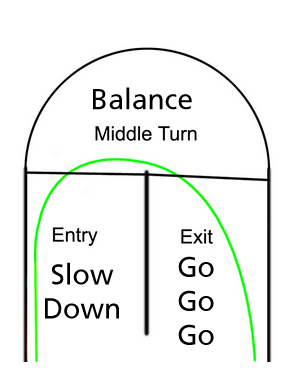
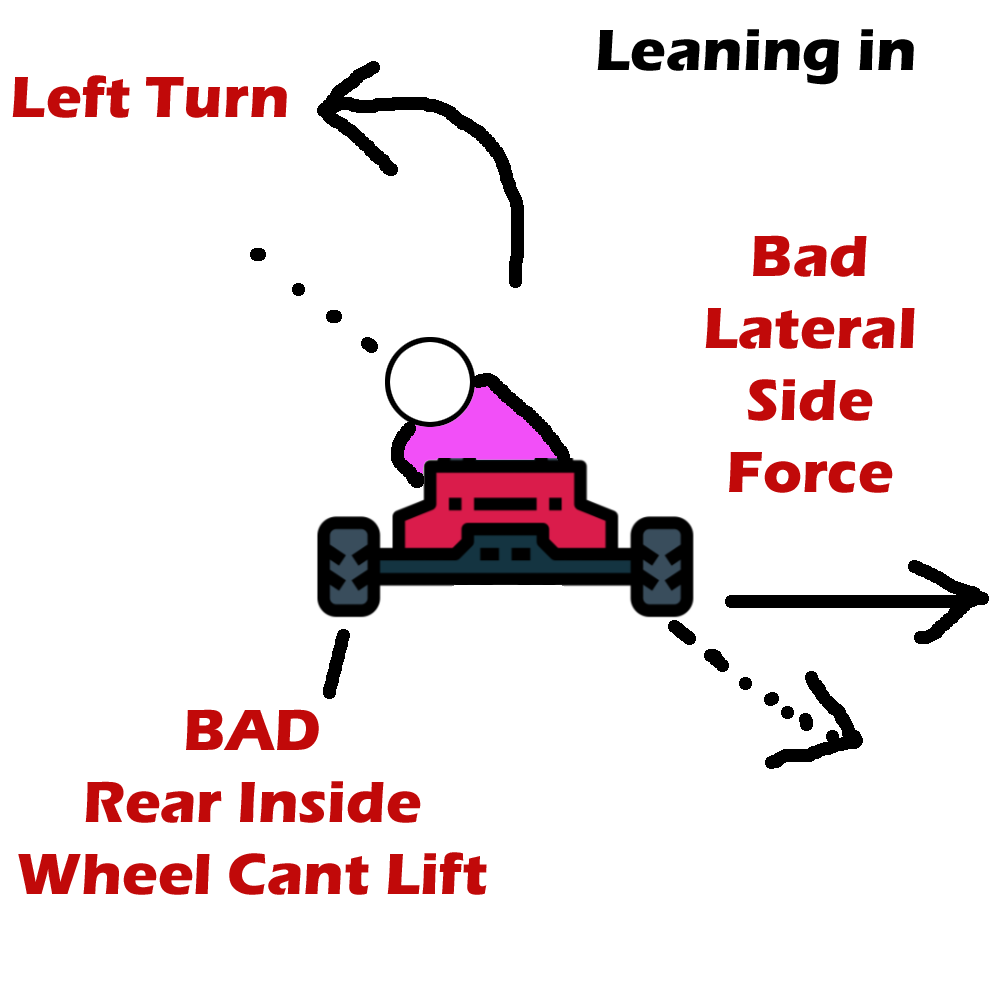
Lower ride height will lower your center of gravity and tend to give the kart more lateral force, less grip and make the front weight seem lighter under load. It can slow the weight transfer speed like taking a bar out might do. And it can help to reduce hop in a high grip situation. The lower ride height settings also lengthen the wheelbase, so they contribute to slower weight transitions and smoother slower rotations.

Higher ride height will raise your center of gravity and can help with an entry push giving you more bite on entry. It can help to fight a slide in the rear on exit, due to over steering. It can give you more grip in low grip situations or the wet. The higher ride height also makes your total length shorter, making your kart more darty and wanting to rotate faster. Which can make the rear more sensitive to slide. It will speed your weight transfer up.

How to avoid the mistake of sliding in a Go Kart

How to Avoid the Mistake of Sliding in a Go Kart

Fixing up Sliding & Drifting

Sliding: It looks cool, feels fast, but the truth is, it is slower than molasses and is a sure fire sign of an inexperienced racer.

Fix the slide, and it’s the surest way to beat all your buddies, qualify for advanced status, and challenge the veterans for fast lap honors.

Added Bonus! This applies to real cars as well.

Why is slding slow?

Indoor karting is all about managing a very small amount of energy, because you have very little horsepower in your engine you can only build your energy up slowly. Once you have momentum you have to bring that energy into a turn, carry it through the turn as you rotate the kart and then make use of whatever you have left on the exit of the turn. Every little bit makes a difference because if you can save energy in a turn then you need less energy to get back up to top speed.

Sliding throws your energy and momentum away in the turn.

After a slide, on the exit of the turn, you have to kind of start all over again building up your momentum energy.

If you slide, fast drivers will just drive around you like you are parked still, and in many cases a slider WILL be parked still.

There are 3 types of slide.
1. The Entry slide
2. The Middle slide
3. The Exit slide.

Just about all drivers are guilty of losing speed at some time to these three types of slide, even the pros. But here’s what you need to know to fix them.

By Entry, Middle and Exit, we are talking about corner phases.

In the image above we are approaching from the left and exiting on the right. 

It is important to start thinking about how each phase also has an optimal assigned purpose, and although they seem obvious they have profound consequences on your ability to be fast.

Goals for the Entry.

Our assigned purpose is to SLOW DOWN! We do NOT want to also be doing anything in the middle and exit that causes us to slow down, we want ALL decreases in speed adjustment to happen in the entry phase.


Goals for the Middle turn.

 Our purpose is to Balance, or to get control of the kart and spread the forces evenly between the front and rear tires. This will let us maximize the momentum and lock the kart to the ground without sliding. This sets us up for the next phase. It is not so much about acceleration here, as it is about balance, many pros only coast through this phase and wait wait wait for balance before trying to accelerate out. Remember if you are doing it right, you are already at the limit of traction here. 

Goals for the Exit.

We want to be doing things to Accelerate us. As a base line, until you get the hang of it, you should wait until you have passed the very middle “apex” of the turn, which is about when you pass the middle of the inside bumper, before you start to apply the gas. Do this and you will always be balanced before you accelerate. And Don’t rush it! Squeeze on easy and steady.

Fixing The Entry Slide. This is a slide that begins on the entry, it might carry on through the middle and into the exit, but it begins on entry.

On Entry we need to SLOW DOWN. Seems obvious right? But it is NOT just braking, there are actually several things things you can do to slow down, whether you know it or not, many drivers ALSO do these slow down things in the other phases of the turn, and this is where the mistakes begin that lose you speed.  These are ALL the slowing actions…

  1. Braking 
  2. Letting off on the gas 
  3. Turning the wheel MORE into the turn, (includes wiggling your hands when IN the turn)
  4. Sliding the rear

Note that each idea has different degrees of slowing potential, so the transition times can be gentle or violent. And in general we want our transitions to be precise, but smooth and gradual, and where possible as gentle as handling a vial of anthrax.

So in an ideal situation, ALL your slowing actions happen in the ENTRY phase of the turn.

For example “Turning the wheel MORE into the turn”, you only want to be adding steering when you are in the entry phase, if you are adding more steering in the middle and exit phase then you are making a mistake that is slowing these phases. If you think carefully about what you are doing in turn where you seem to be slow, you can find these mistakes on your own.

The second goal of the entry is to get your kart SET for the turn, in an optimal way. In almost every situation, with very very rare exceptions (which won’t matter until you are seasoned pro), you should be LEANING OUT OF A TURN – NOT INTO A TURN! And you do this on the straight before the entry – NEVER after you have turned the wheel in, always before. Take my word for it, it’s critical to speed in an indoor kart. There are very real reasons for this that any pro can explain to you.

If you slide beginning on entry, it almost always just means you are coming in too hot, or braking too late. Generally here we mean your rear wheels are sliding. It is possible that your front wheels are sliding too, but generally this does not happen until mid turn.  It’s the same cause though, coming in too hot. So start slowing down earlier!

The fastest deceleration will happen in straight lines, so in general if you want to brake late and more effectively, you should look for ways to brake in straight lines BEFORE you turn the wheel. You have rear brakes so lean backwards when you brake to put your weight on the rear – YES it makes a difference – the easy way is to lift and keep your head up high when you apply the brakes.

Fixing The Exit Slide. This is a rear slide that begins on the exit, after a stable entry and a stable mid turn entry.

Before we discuss the middle slide, we will look at the most common error, the exit slide.


Exit slide almost always means you are getting on the gas too early, but it can also mean you are offline and turning in too early. In general though, with even a little practice we can make any line stable with the right foot and hand work, so the exit slide can be a little deceiving when you are chasing the last .100 seconds. Even being slightly off line you can still qualify if you fix this one, you just won’t beat the fast guys until you fix the line.

So if sliding on exit, the first thing to try is to just get on the gas later. And the next thing to ask is, “Should I turn in later?”. You will know if you need a later turn in, because the other drivers will seem slow on the entry but pull away from you on the exit while you are still stuck trying to turn.

If you find you can not get full throttle until you are way past the middle of the turn, then you DEFINITELY have a bad line. You need to turn into the turn later, so delay your entry a bit and wait a bit more before you turn in. Start by deciding EXACTLY where you will turn in, and make sure you can hit that spot consistently. Then make adjustments, if you think you need to get on the gas earlier, move your turn in point forward by about 3 inches at a time, until it feels right.

Remember now you might need to slow down on the entry a little bit more to make it work. Don’t let that bother you, as any pro will tell you, the secret trick is to be SLOW IN and FAST OUT. As you will soon learn, fast in and fast out, generally doesn’t work, because it places you too close to the limits and messes up the balance and transition phases. Fast in-fast out strategies are very inconsistent and unstable, and the regular mistakes result in catastrophic loss of speed. Also the only way to make fast in fast out work, is to drive a big wide sweeping line, which makes the track so much longer, that you never make up for the time lost. That’s when you experience the feel of drivers pulling away from you in turns while you are still stuck rotating in the turn.

Fixing the Middle Phase Slide. This is a slide that begins after you have slowed, are approaching the apex and getting ready for the exit.

Take note of the shape of the driving line in our diagram, note that it arcs more in the Entry, then it opens out in the Exit phase and is almost straight in the exit. This is the classic slow in fast out line, with a slightly late apex.

Remember TURNING INTO a turn slows you down a little, so TURNING OUT should speed you up a little. Note the shape of the arc through the middle, it almost holds steady through the middle, without increasing, while it starts to open at the apex.

If your entry was stable and you start to slide in the middle, it could be several reasons, but generally it means you did not get set up for the turn early enough, and you are still trying to make radical inputs. 

In general you should be all set by the middle, and not need to be slowing down or speeding up, or changing lines. You should be holding steady and either coasting or making very very very subtle movements to maintain control and balance.

The reason coasting the middle works so well, is that during your entry phase a lot of the weight is thrown to the front of the kart, which makes the rear of the kart light. You have almost no traction at all in the rear, if you are doing things right. By coasting, the weight gently returns to the rear wheels and evenly distributes between front and rear wheels, giving you maximum rubber to carry the turn. As you begin to release the steering input more weight shifts to the rear and front pressure drops and the rear tires are given downforce to accelerate you out.

Hit the gas too early, before that weight has balanced, and you lose the back end (slide). OR another type of problem can happen, called the push, because the back plants and the front gets TOO light, you lose front steering. OR another problem called the BIND, where the back wheels plant – the weight shifts rearward and all four wheels fight causing a braking effect as you try to accelerate out. SOLUTION: Be patient – wait for the balance.

As you become a pro, you will learn to develop ‘the feel’ to be able to push the limits, and there definitely *tricks* that can be taught to cheat the balance, but it all begins with mastering the balance in the middle through coasting first.

Review of kart sliding problems and solutions

1. ENTRY SLIDE   – COMING IN TOO HOT  – SLOW DOWN MORE!!
                              – BRAKING TOO LATE    – SLOW DOWN EARLIER

2. MIDDLE SLIDE – OFF BALANCE – COAST MORE
                            – ADJUST YOUR SPEED EARLIER**

3. EXIT SLIDE – GETTING ON THE GAS TOO EARLY  – PATIENCE
                        – OFFLINE – APEX LATER

Remember the purpose of each phase
Entry = slow down
Middle = Balance
Exit = GO GO GO

Advanced TIP: Middle slide often happens because we are able to get into a corner with stability, but then in the middle suddenly realize we need to make an adjustment. Already being at the limit, even with a slight throttle blip or fractional twitch of our steering, we lose traction slightly.  If you find consistent mid turn instability, begin by asking yourself what the adjustment is that is causing it, and then resolve to do that adjustment earlier, even if you don’t think you need it yet. You almost always find after this modification to your line that you get more acceleration through a turn. This will really help you in a sweeper turn.

If you find Indoor Karting fun, and want to learn from the best drivers, come and jump into the racing leagues, they’re open to all skill levels and you are guaranteed to get faster.

Shout Out to Bernie at Racing For Beginners

Shout Out to Bernie at Racing For Beginners

If you’re looking for another website for karting advice on your journey to excellence, may I recommend my good friend Bernie and his son Senna. Bernie goes through the motions of being a dad with a kid in karting and has great perspectives on challenges of coming up through the ranks and coaching a young one with talent.

Bernie is a friend of mine who frequents my favorite track Sykart Tigard Oregon. He has come a long way with his son Senna, who by the way handsomely smoked me on the track the other night. LOL. Go Senna!

So here’s an article of his that talks about the voice within that we have to contend with when we’re trying to get our race on. Sometimes that voice is on our side, and other times it’s our worst enemy. Bernie puts together a great article.

Anyway, I hope you like his site as much as I do.

Anthony.

Bernies site has great advice for parents with kids in karting.

10 Mistakes Karters Make that Cost Speed

10 Mistakes New Karters Make that Cost Speed

Introduction

When I first hit a go kart track I had challenged another driver to a race. Little did I know back then, but this guy had raced for years in the Skip Barber series and had even trained with Bob Bundurant.

At that time I took great pride in my ability to be able to control a car under a slide. I thought this was some kind of skill.

What happened next was a complete embarrassment, the guy began to destroy me and lap me like I was a grandma on sleeping pills.

I was completely confused but amazed, how was he doing this? Why was he able to do this? What the hell was going on?

That began a lifelong journey for me, I was making pretty much all of the mistakes I mention here. But I’m going to save you the years it took me to learn about them.

In this article we look at 10 mistakes that kart racers make when trying to drive fast. There are many things that can slow us down in a kart, but eliminate these and you’ll be much faster in no time.

Mistake #1 Sliding

A cardinal rule of karting is that “Sliding is Slow, Traction is Fast”. There are many reasons why we slide and we will look at some of those here. The problem is that when we slide it practically puts the brakes on the go kart. You could almost say that the ‘anti slide’ design is a safety feature of the design, but it’s actually a design intended to allow a go kart to be faster in corners.

A go kart has a solid rear axle, and that means that both rear wheels must always rotate at the same speed. That’s a problem in corners because the arc travelled by the inside wheel must always be less than the arc travelled by the outside wheel. And so because the wheels are the same size, the left rear and right rear tires go into a battle for control when in corners.

In a standard car this is handled by a mechanical marvel known as the differential. The differential allows each wheel to be able to travel independently of each other.

And so the inside wheel of your car can travel more slowly than the outside wheel. But a go kart can not do what the differential allows and if both wheels are flat to the ground then one of them must act something like a brake, skipping and losing traction.

To facilitate this the go kart is designed to ‘tripod’ or tip over onto 3 wheels, where the inside rear wheel lifts off the ground. This allows the inside rear to spin freely while the outside rear handles traction and rotation of the corner. A go kart is able to go quickly through a turn. because of that inside rear wheel lift.

But now consider what happens when the kart slides. That inside rear wheel that is lifted into the air, all of a sudden, comes slapping down onto the ground. At the same time the kart twists and the rear steps out. The rotation of the kart must now deal with two rear tires in battle because when they are flat the kart wants to go in a straight line, not turn.

All of this effectively puts the brakes onto the kart and it is not uncommon to see a kart come to a dead stop after a slide. It is also not uncommon to hear the engine bog down under load as the kart struggles to complete the turn.

Even a very slight slide is going to place a minor braking effect on the kart and throw energy to the wind. At the upper levels of racing it is often just a battle to see who micro-slides the least as they push their karts to edge of the limits.

Mistake #2 Turning and braking at the same time when under maximum brake.

To facilitate this rear wheel lifting the kart is also designed to shift the weight forward while under brakes and to lift the rear inside wheel off the ground when you are turning slightly.

When under a lot of braking pressure BOTH wheels actually become light. This creates a problem that can take half of your braking power away when you turn the wheel.

Now while trail braking (turning and braking at the same time) is an advanced braking technique, many drivers don’t know how to do it correctly and end up coming into turns way too fast and spinning out of control.

The correct way to brake at maximum force is to lift your head up, lean back, and brake in a straight line. Note how the back wheels become light and effectively lift off the ground when under heavy braking.

Mistake #3 Getting on the gas too early

So now that we have established that sliding is the enemy and why let’s consider what happens when you get on the gas too early. In a nutshell, you slide. 

The reason is because the forward weight bias created under braking needs time to settle the rear wheel down force again. Usually this is handled by coasting for a short while to allow the back wheels to seat themselves.

As a general rule you should wait until you reach the apex (The middle of the turn) before you attempt to reapply the gas.

Consider the kart in the middle of the image here. The rear wheels are still slightly light and effectively without downforce, while in the middle of a turn and before reaching the apex. If you try to apply gas at this stage of the karts imbalance you will induce a slide.

The solution is to wait, and don’t get back on the gas too early. 

Mistake #4 Braking Too Late

There is a common misconception amongst intermediate drivers that the trick to being faster than others is to apply the brakes later than others. Indeed it has the potential to make your straights longer, so why not?

The problem is that it increases the forward bias and jarres the weight transfer violently when you slam on the brakes at the end of a straight. It becomes impossible to maintain control and balance after a certain point.

The best way to brake is to find a moderate point at which you can begin squeezing and slowly increase the pressure with a smooth consistent build up. Then use timing and a “brake point” at which you begin to control your speed into the turn. If you find you are coming in too fast, (because you have a loss of control on entry) then move your brake point forward and brake earlier. If you find you can easily take the turn then you can move your brake point forward.

By dialing your brake point in like this, you can eventually have perfect brake control on every turn.

Mistake #5 Getting off the gas too late

This mistake is somewhat related to mistake #4. Before you can brake you will want to get off the gas. You dont want to be braking and accelerating at the same time either. So at some point you need to make the transition from racing and accelerating to decelerating. Sometimes we have to coast before we make the transition to braking.

In some turns we dont brake, we only lift off the gas and coast for a while before getting back onto the gas.
A common place where this kind of mistake occurs is in sweeper turns. Sweeper turns are deceptive because as you enter them you are at no risk of sliding, but as you get more into the turn the lateral forces build up and eventually you have to release the gas or suffer a loss of control.

But it is often the release of the gas that actually causes the loss of control. This is because as you lift off the gas while in the sweeper your weight shifts forward and the rear wheels lose their downforce. This is the classic case of ‘snap oversteer’ and it is caused by getting off the gas too late.

On the contrary the faster driver lifts off the gas early and as he enters the sweeper for a brief moment. This causes the kart to dip forward and tilt over, establishing firm front and rear outside grip first. Next the fast driver reapplies the gas as others with less experience have to lift and lose control.

As a result the pro travels at full acceleration through zones that others are sliding and scrambling to maintain control.


Mistake #6 Leaning Into Turns

This is a very common problem of new drivers and even some more experienced drivers. As you go through a turn the inertia is going to want to throw you to the outside of the turn, so why not fight it like a motorcycle rider and lean over and into the turn?


There are several problems with this mistake. First the rear inside wheel has more trouble lifting, so we force the rear wheels to stay flat. That causes the binding effect and drag of the rear wheels. It also hinders the kart from gaining maximum roll speed through the turn.

The next problem is that the lateral forces created by your body have a tendency to push the wheels outwards, this makes you more susceptible to sliding.

Here is what happens when you lean out of a turn. You assist the rear inside wheel to lift. You also change the lateral down force so that instead of pushing the weight laterally you push down on top of the wheel. This gives you extra grip.

The important thing to remember though is that you MUST lean out BEFORE you enter the turn. If you start to lean when you are in the turn or going into the turn then usually this is too late, and will upset the kart balance.

So if you are going to lean then do it early, while you are still on the straight.
 

Mistake #7 Not Knowing and Not Looking Where You’re going

This is a common mistake amongst newer drivers who tend to look either directly ahead or directly at the driver who is just in front of them.

There are always very specific places on the track where you need to focus your attention and your eyes. Those points are your apexes, or the mid points of your turns. You need to know where those points are down to the fraction of an inch if possible.

Mike Smith (US indoor national karting champion) used to be fond of saying, ‘the kart will go where your eyes are looking’. That means if you’re staring at the kart in front of you, and you’re faster than them, you’re either going to hit them or hit what they hit. If you’re looking at the corner, you’re probably going to go around the driver in front of you and not into them.

In the image below the cross hair shows where the apex is for this turn and this is exactly where your eyes need to be. The white line on the track also shows an imaginary path, this is what you literally have to paint onto the track with your imagination so you can drive your wheels over the line. We call this the racing line and it is basically built from the apex and turn in point.

The important thing is to find your apex and to focus your eyes on that point from as early as you can possibly see it.


Mistake #8 Turning in too early or too late.

Another name for this is ‘racing into turns’. This is a common problem among new drivers who are in the ‘racing’ mode. You can imagine the situation, there’s a race on and in the hurry the driver turns in early.

In the image below the red line shows the consequence of turning in early, while the white line shows the preferred line. By turning in early the exit is choked and the driver is out of position for the next turn, which is now extremely difficult to take quickly. The white line driver on the other hand has sacrificed his entry for an accelerated next turn. These kinds of trade offs are considered and made on every track. There is a perfect optimal turn in point at every turn.


Mistake #9 Moving your hands around while in a turn.

This is a common mistake made by drivers who like to “drive by feel”. I often see the front wheels of these drivers flapping around like fish. The only thing I can liken this to is driving a ‘nautical mile’.

Now imagine for a moment that you entered a turn within a split hair of losing traction, you are finely riding the absolute limit of possibility. That is the optimal fastest way to travel a turn. But now what happens when you start quivering your hands around? Those micro movements will displace the weight and push you over the limit.

For this reason you should always look for a way to be able to take a turn by holding your hands steady on one long sweeping optimal arc. You might have to make some adjustments on entry or slowly unwind your exit but the main highest G force portion of the turn should be made and held with one steady input. This will stop you from sliding.

Mistake #10 Trying to drive by reflex and not timing.

Another problem with driving by feel is that the standard human reflexes have about a 200th of a second response time. Even in a relatively slow indoor kart, and a top speed of around 15 meters per second you will travel 3 meters before you can even twitch a response to what you are feeling.

That might as well be a mile off mark. For this reason driving is more about timing than it is reflexes. This means you need to get your bearings early, on straights before turns, and as much in advance as you can.

Always look for ways you can use timing rather than reflexes. One way to do that is to look for marks and markers around the track that you can use for timing. Cracks in the ground, paint and objects on the sides (preferably objects that wont move). This is a cheats way of staying on line, but it works very well.

I remember once while racing in the 24 hour enduro of Charlotte at VLK raceway. I was botching one of the turns every time, and I had a teammate on the radio with me asking “what’s up with that turn?”. I was in the seat for an hour and for the first 15 minutes missed the apex just about every time.

There was just something about that turn that made it impossible to naturally hit the apex.

So I started to time my turn in point by using the tires on the entry as markers. I chose a tire that was somewhere about right and decided I would turn in at that tire. I came through the turn and early apexed. That’s okay I decided next turn I would turn in at the next tire.

Again I came through the turn and early apexed, but not as bad this time. I moved my marker ahead one more tire.

This time it was different, I came through the turn and nailed the apex perfect. I kept my focus on that turn in point marker for the rest of the session and nailed the apex perfectly for the rest of the hour.

That’s how you use timing to beat feel and beat reflexes.

Conclusion

That’s the first 10 mistakes that slow you down in a go kart, that come to my mind. Almost all of them are basically related to avoiding the slide and staying on the driving line. I hope these ideas will help you to find speed on your track.

Is Go Karting Hard, or Difficult?

Is Go Karting Hard, or Difficult?

Go Karting is one of those sports that is simple to learn but can take years to master. Many pros will say ‘You need seat time’. For this reason it’s not uncommon to see kids as young as 4 years old hitting the kart tracks.

Is go karting hard? Not to this youngster!
Karting is an easy sport even for youngsters and adults of all ages

Karting is also very rewarding and a lot of fun, so you can instantly feel the joy of making progress. Kart rental tracks are in almost every city of the world and small communities develop at each track. There is almost always someone around to help and give advice.

When I first started karting I was worried that I wouldn’t have what it takes to compete and so I didn’t want to get on track in real actual races. There was an indoor karting national champion at the track on that day, Mike Smith, and he told me, ‘Hey if you want to get better at this sport then jump on track with guys who are better than you, and you won’t find any better than guys running in a racing league. It doesn’t matter if you win or lose just try to come away being a little better than you were before, it’s easy as that’.

The next day, I was in a racing league, after having only 1 day on a race track. LOL, but maybe that’s a story for another time. How did I do though? I did awesome, racing is easy, you just have to get on a track and do it.

But if you’re worried about being competitive and getting to the track is too time consuming or expensive then spending some time in computer racing simulators can give you a huge edge. This makes it much easier to learn about racing.

Go karting can be hard on your body putting a lot of pressure on your ribs and on your neck. But you can get safety equipment to help with this, like Rib Protectors and Neck Braces. After about maybe 6000 races (I really don’t know how many) I don’t actually use any of this gear because the indoor karts are designed to protect you from these problems with safety pods, large seats and head padding.

So is karting hard? No, not really, it’s a lot of fun and as easy as driving a car. Karting just gets tricky when you want to compete with others because it is a sport where skill makes a huge difference between who wins races and who doesn’t.

If you haven’t done so already, give karting a go. Search for ‘indoor kart track near me’ on Google.

Is Indoor Karting Fun?

Is Indoor Karting Fun?

“I’m bored how about racing?…”

One Sunday afternoon in my late 30’s, I was bored out of my mind and wondering what I could do with myself that day. I took a quick stroll through memory lane and thought of all the coolest and most fun things I had ever done. I recalled learning how to drive as a kid on a race track with my dad and I wondered, “are there race tracks where you can rent cars around here?”
So I searched for ‘race track near me’ and an indoor go kart track came up on the results.
“Hmmm, Go karts? Aren’t they really fast? Like aren’t they like driving formula one race cars?”
So I gave the track a call and they were open and ready for “walk ins”, I guess that was me so it was about 1pm and I drove down to the track.

Is indoor karting fun? Drivers of all ages declare HELL YES!
A typical day at the indoor track. You might think it’s just for kids, but drivers of all ages test their skill and push the edge of the limits.

“Lets move out to the karting race track!”

When I got there I didn’t know what to expect, but the staff were really friendly and the karts were set up like a real little race track. They made me watch a video on flags and hand signals and got me into race gear with a helmet and overalls.
When I went out to the track there were many karts and people ready to race and a bunch of us went out together. I didn’t know any of these people but it was cool to have someone to race against.
As we sat in the pits, they started our engines and we sat there for a moment revving up and getting ready to go. I had adrenalin pumping as I looked around to see who else I was racing against. There was an older guy here, a dad and his son I think, and a few guys in their 20’s. It was ON!

“Get Ready… GO!”

They gave us the green flag, and for the first time in years I felt the joy of being allowed to drive a vehicle as fast as that vehicle would allow you to go. You know what I mean? I mean most times we have a car that we can’t speed in, we can’t floor it, we can’t really push the limits. But not on the race track, we can push it as hard as the machine will allow. Admittedly that’s not a great deal, these machines are not going to send you into a wall at 100Mph, but I found it impossible to not lose control.
As I slid around and raced against everyone on the track I became addicted. Hopelessly addicted.

“So much fun, I’m addicted to indoor karting for life..”

During this first day at an indoor race track I raced 22 times. A total of 220 minutes on the track. I ran race after race until the track closed at 11pm. A total of 10 hours at the race track. Since that day I have clocked up thousands of more races. I also became involved in league racing tournaments, national and international racing events.
Now would I say karting is fun?

“You betcha it’s fun! There’s almost nothing I would rather do.”

If you haven’t done so already, give karting a go. Search for ‘indoor kart track near me’ on Google.

Indoor go karting tips for braking

Indoor go karting tips for braking

Braking is probably the one skill that sets the fastest indoor karters ahead of the fast indoor karters, or at least the karters who win all the races.

In this article I will go in depth about braking, and different types of braking under different conditions. We will take the development of your braking technique in 3 stages.

Stage 1. No brake at all technique.

Stage 2. Straight line threshold braking technique.

Stage 3. Trail brake technique.

Now for stage 1 of your training I suggest working on a no brake at all technique. The reason for this is that you have to learn how fast you can actually roll through a turn before you can know if you are hitting the brakes too hard and rolling too slow through a turn. You have to learn the limits of your traction. You might be surprised how fast you can actually roll through a turn.

In order to execute a no brake practice session you have to first pick a mark as your starting “let off the gas” point. Drive up to this mark, let off and coast. Now if you slide on the entry of the turn, then you got off the gas too late, you’re coming in too fast, and you have to get off earlier and try again until you don’t slide the entry. If you slide on the exit, well that’s usually getting back on the gas too soon. We are also going to assume here that you’re on line and not turning too late or too early. If you can get through the turn without sliding, then try to push your let off point forward a bit.

Your goal here is to develop the “feel” for the limits of your traction. This is how fast you want to be rolling AFTER you have hit the brakes to slow for the turn. The nice thing about a no brake turn, is that it is usually very stable, and so you can really feel what it’s like to load up the wheels and coast at the limit of traction.

First my advice for standard braking is not to fall for the drama you see on TV as you watch Formula One racers making crazy late braking moves down the inside straight as they make a pass. That late braking move is NOT fast, even though it’s enabled them to pass another driver. It’s actually very slow and inconsistent. It’s slow because they’re way off line, and it’s inconsistent because it pushes the limit of the threshold and runs the risk of breaking loose. And anytime you break loose on an entry you can expect to vary your lap times by 300th of a second. And you don’t want variance like this, it will get you passed.

As always my golden rule for indoor karting is no sliding allowed, so the goal is *almost* always to brake without inducing a slide. Yes there are exceptions to the rule, but it is very rare that an entry slide is going to be the fastest approach to a turn.

So there are two main things you want to strive for with your braking. Consistency, smooth weight transitions.

You want consistency because it’s better to take a corner 100th of a second slower than the fastest lap possible, if that fastest lap involves a late threshold brake with a high risk of losing it. What you’ll find when you study videos of those sessions is that your corner times are going to be all over the place, and your average is going to be less than the consistent approach. Mike Smith was always a big advocate for smooth consistent braking. He was never the fastest lap, but always the champion. And he took that idea to he nationals and won.

So now you have a no brake technique down, and you’ve had a chance to do some sessions and feel the limit of traction, lets go to stage 2, straight line braking.

Now we are going to move our brake point ahead a bit.

The most important thing though for a consistent braking experience is to have a consistent braking point for each turn. I usually use a marker on the side of the track, maybe it’s a dark patch of oil, or a crack in the track, a tire on the side, sometimes paint on the track, and some tracks will let you arrange cones on the sides of the track. Use that mark as your starting point for your brake zone.

For consistency I start with a steady but moderate braking pressure, which I will increase as the speed comes down and the risk of breaking loose comes down with it. This gives a smoother weight transition, with your inertial mass moving from center balance to the front wheels very gradually. This is important because it sends you into the turn with very steady balance and a high level of grip. This allows you to consistently hit a turn at greater speed. It is better to brake a little bit earlier than try to push your limit right up to the last inch.

Now again if you find you are sliding on the entrance then you are coming in too fast, and you need to brake earlier. Note I didn’t say, brake harder, I said earlier.

Now if you manage to make it stick and you are getting through the corner easily, then you can move your brake point forward. I usually move in increments of about 1 foot forward and backwards, but once you are close to the ideal mark, you can try moving +/- 3 inches. But again, I suggest you don’t try to push your luck with a brake point if you want to be consistent.

Now in stage 2, we only want to brake in straight lines, we don’t want to brake and turn the steering wheel at the same time. This is because the wheels are already doing the maximum work trying to slow you down, now if you add an extra load on them to turn as well, you’re running a high risk of losing the back end and going into a slide.

So in stage 2, you will brake in a straight line and as the turn in starts, you’ll release the brake and go into a coast. You’ll coast all the way to the apex, and then you’ll get back on the gas with a squeeze.

You should know by now what speed you need to carry through the turn so you should find this is very fast. This is the technique Mike Smith used to win the nationals, so it’s really fast. But it’s not the fastest.

The other common problem with an entry slide is that you are turning the wheel and braking at the same time. This is called trail braking. And this is an advanced braking technique that I will now. For now, you don’t want to start with this, you want a straight line braking system to work for you first. That’s because a trail brake is a very hard thing to master and can take years to get consistent. But let’s talk about it now.

Stage 3, the trail brake.

Now you are basically going to do the same thing as stage 2, only now you are going to move your brake zone forward even more and continue to brake past your turn in point. So you brake down the straight, then through the turn in entry. Again if you can’t stick it, then you brake earlier, and maybe even softer. If you do manage to stick it, then you can push your brake point forward even more.

For this I like to brake fairly soft and steady so the weight can transition slowly and build up on the front of the kart. In some corners you’ll want to brake all the way to the apex. In some corners you’ll only brake for a little ways into the turn before releasing for a coast. The magic of a trail brake is that it will allow you to enter a turn with a good portion of your weight baring down on the front wheels and it sets you up nicely for roll speed through a turn.

Again the risk here is that you lose go over the threshold and lose the back end. This happens easily because all the weight has shifted to the front of the kart, and the back is light. You’re going to need to get the rear weight back down in order to be able to accelerate safely.

Sometimes a trail brake that throws a lot of weight forward can delay your ability to get back on the gas, and so you can lose feet as you try to get the rear to gain traction again.

For this reason I like to use a blip on the gas (or two) before I actually start to squeeze on the gas. The idea is that the blip will force a more rapid weight transition back to the rear wheels, BEFORE you start to accelerate. This can allow you to compensate for the extra forward load, and balances the weight more quickly. The idea of the blip is that it will only cause a small inertial weight displacement, shoving the kart forward a little bit, but not cause the rear wheels to break loose and spin out. If you were to say quickly, ‘one and then two’ This is about the timing that you need to do a blip and squeeze application of the gas.

And so that’s my tips to develop advanced braking techniques in an indoor go kart.

Good luck, see you on the track.